
Bathroom De Clutter Challenge


Happy Monday! I hope you all had a great weekend. We had a very productive weekend, finishing off various little projects around the house and in between made time to relax and enjoy ourselves too.

Today we are talking Bathrooms. We only have one bathroom in our house and its tiny, so the more reason to keep it organise and de clutter. Challenge of the month is to organise under the Bathroom sink, that means throw away unnecessary items...promise it wont take you long about 30 mins.

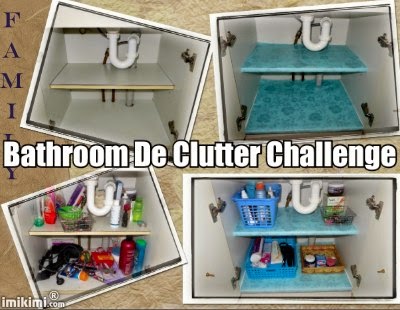
Start off by taking everything out from under the sink and drawers (we dont have any drawers).

Next sort and bin...
  • Tossed any products that have expired
  • group same products/items together for easy visual count (Hair products, pampering, make up, dental hygiene, etc
  • gather some baskets and containers and place for example all your hair products in one basket/container (shampoo/conditioner, hair oils, hair spray etc) Do the same for your pampering products, dental needs and make up (if you dont keep make up in the Bathroom, use your container for other items that you regularly use).

For your hair tools, you can create holders out of tin cans, glass jars, and pretty pots.Easier to grab and use.


Clean your cabinet thoroughly with a Bathroom cleaner or a homemade cleaner of half water, half vinegar in a spray bottle. Line your cabinet/drawers with pretty contact paper.  I line the inside of our cabinets with a pretty turquoise paper to match some of the decor in our Bathroom.

Next place all your organised baskets and containers back under the Bathroom sink. You could label your baskets/containers if you want to ( i left mine without labels). Now you will find its so much easier to know where everything is, you dont need to pull everything out to find a particular product/item, saves you time,  and takes about 30 min of your time, plus it cost almost nothing (only cost was a roll of contact paper).

Now here is the Before & After

Much better!!! Stay tuned! Coming up the Minimalist 30 piece Wardrobe Challenge!

Happy Organising!!!

Sandra


Comments

Popular posts from this blog

DIY: Driftwood Wind Chime or Wall Art

DIY: Driftwood Wind Chime or Wall Art I love bringing treasures from the beach. I love collecting interesting pieces of driftwood and shells. I think most people do but most don't know what to do with their finds. I been wanting to create a beautiful piece with driftwood and shells - its a wonderful way to bring a little bit of the ocean into our homes. Here's a peek: I was inspired by the almost perfect concave shape of the driftwood. There's lots of versions of this wind chime/wall art using driftwood. I decided to make my own version with some of my beach treasures. Step One: Find the right piece of driftwood. Not too flimsy and long enough to attach at least five pieces of twine. Find a driftwood piece that's interesting and has the right shape. Here's the Materials you need: driftwood & seashells natural twine hot glue gun (not shown) scissors Step Two: Lay out your materials onto your work space and piece together how you

Quick Craft Tuesday

Today i am bringing you a quick an easy crafty project that can be completed in 15 minutes or less. We are talking about a nightstand charging station for your mobile phone. I like to keep my mobile phone next to me at night time for easy access and that's the time i like to charge my mobile phone too, so it makes sense to have a charging station on my nightstand. This charging Station was re purposed out of an empty "Clinique gift box".  The box was the perfect size and shape with a pull out drawer. Its very simple and inexpensive to make, you will need: An empty gift box (preferably with a pull out drawer) pretty wrapping paper  scissors glue sticky tape Wrap empty box with your preferred pretty wrapping paper ( there's a few ways to wrap a box, easiest way its to cut a long strip of wrap paper that will go around entire box, glue or sticky tape ends to the inside of box and then cut two strips for the sides of box and again glue or sticky tape ends

7 Tips For Preparing Your Home For Winter

Its only the start of Autumn, but the cold weather will be here before you know it. Get a head start and prepared yourself for those cold and rainy days by taking care of a few things inside and outside your home before the cold sets in. Here are 7 tips to help you prepare for those wintery days...   Change your Bedding : Wash and dry all your summer bedding and store away. Swap your light weight Doona to a heavier one or add wool blankets.  Layer some woolen throws at the end of your bed for extra warmth and comfort.   Wardrobe seasonal change : Just like the seasons change, so should your wardrobe. Be ready for the winter season by bringing out you winter jumpers and long sleeve tops and packing away your summer tops, shorts and beach dresses. Organise your shoes by packing your summer havaianas and sandals and bringing out your wintery boots.   Clean Your Gutters : Stay on top of leaves this Autumn and once the last one has fallen to the ground, it’s time